Protect Excel Worksheets & Workbooks: The Complete Guide
Secure Your Spreadsheets: Protecting Excel Data Integrity
Ever spent hours crafting the perfect Excel spreadsheet, only to have someone accidentally overwrite a crucial formula or delete important data? Or maybe you need to share sensitive financial information but worry about unauthorized eyes seeing or editing it? If you’re nodding along, you know that protecting your Excel sheets and workbooks isn’t just a ‘nice-to-have’—it’s often essential for data integrity, collaboration control, and peace of mind.

We get it. Spreadsheets can hold complex calculations, sensitive projections, or carefully organized data. Leaving them wide open is like leaving your front door unlocked. The good news? Excel provides robust, built-in tools to lock down your worksheets and workbooks. This guide will walk you through exactly how to use them, from basic sheet protection to locking specific cells and securing your entire file. We’ll cover the practical steps, explain why each method matters, and help you choose the right level of protection for your needs.
Protecting a Single Excel Worksheet from Editing
This is often the first line of defense. You have a specific sheet (maybe with final results or complex formulas) that you don’t want others changing. Protecting the worksheet prevents edits to locked cells within that sheet.
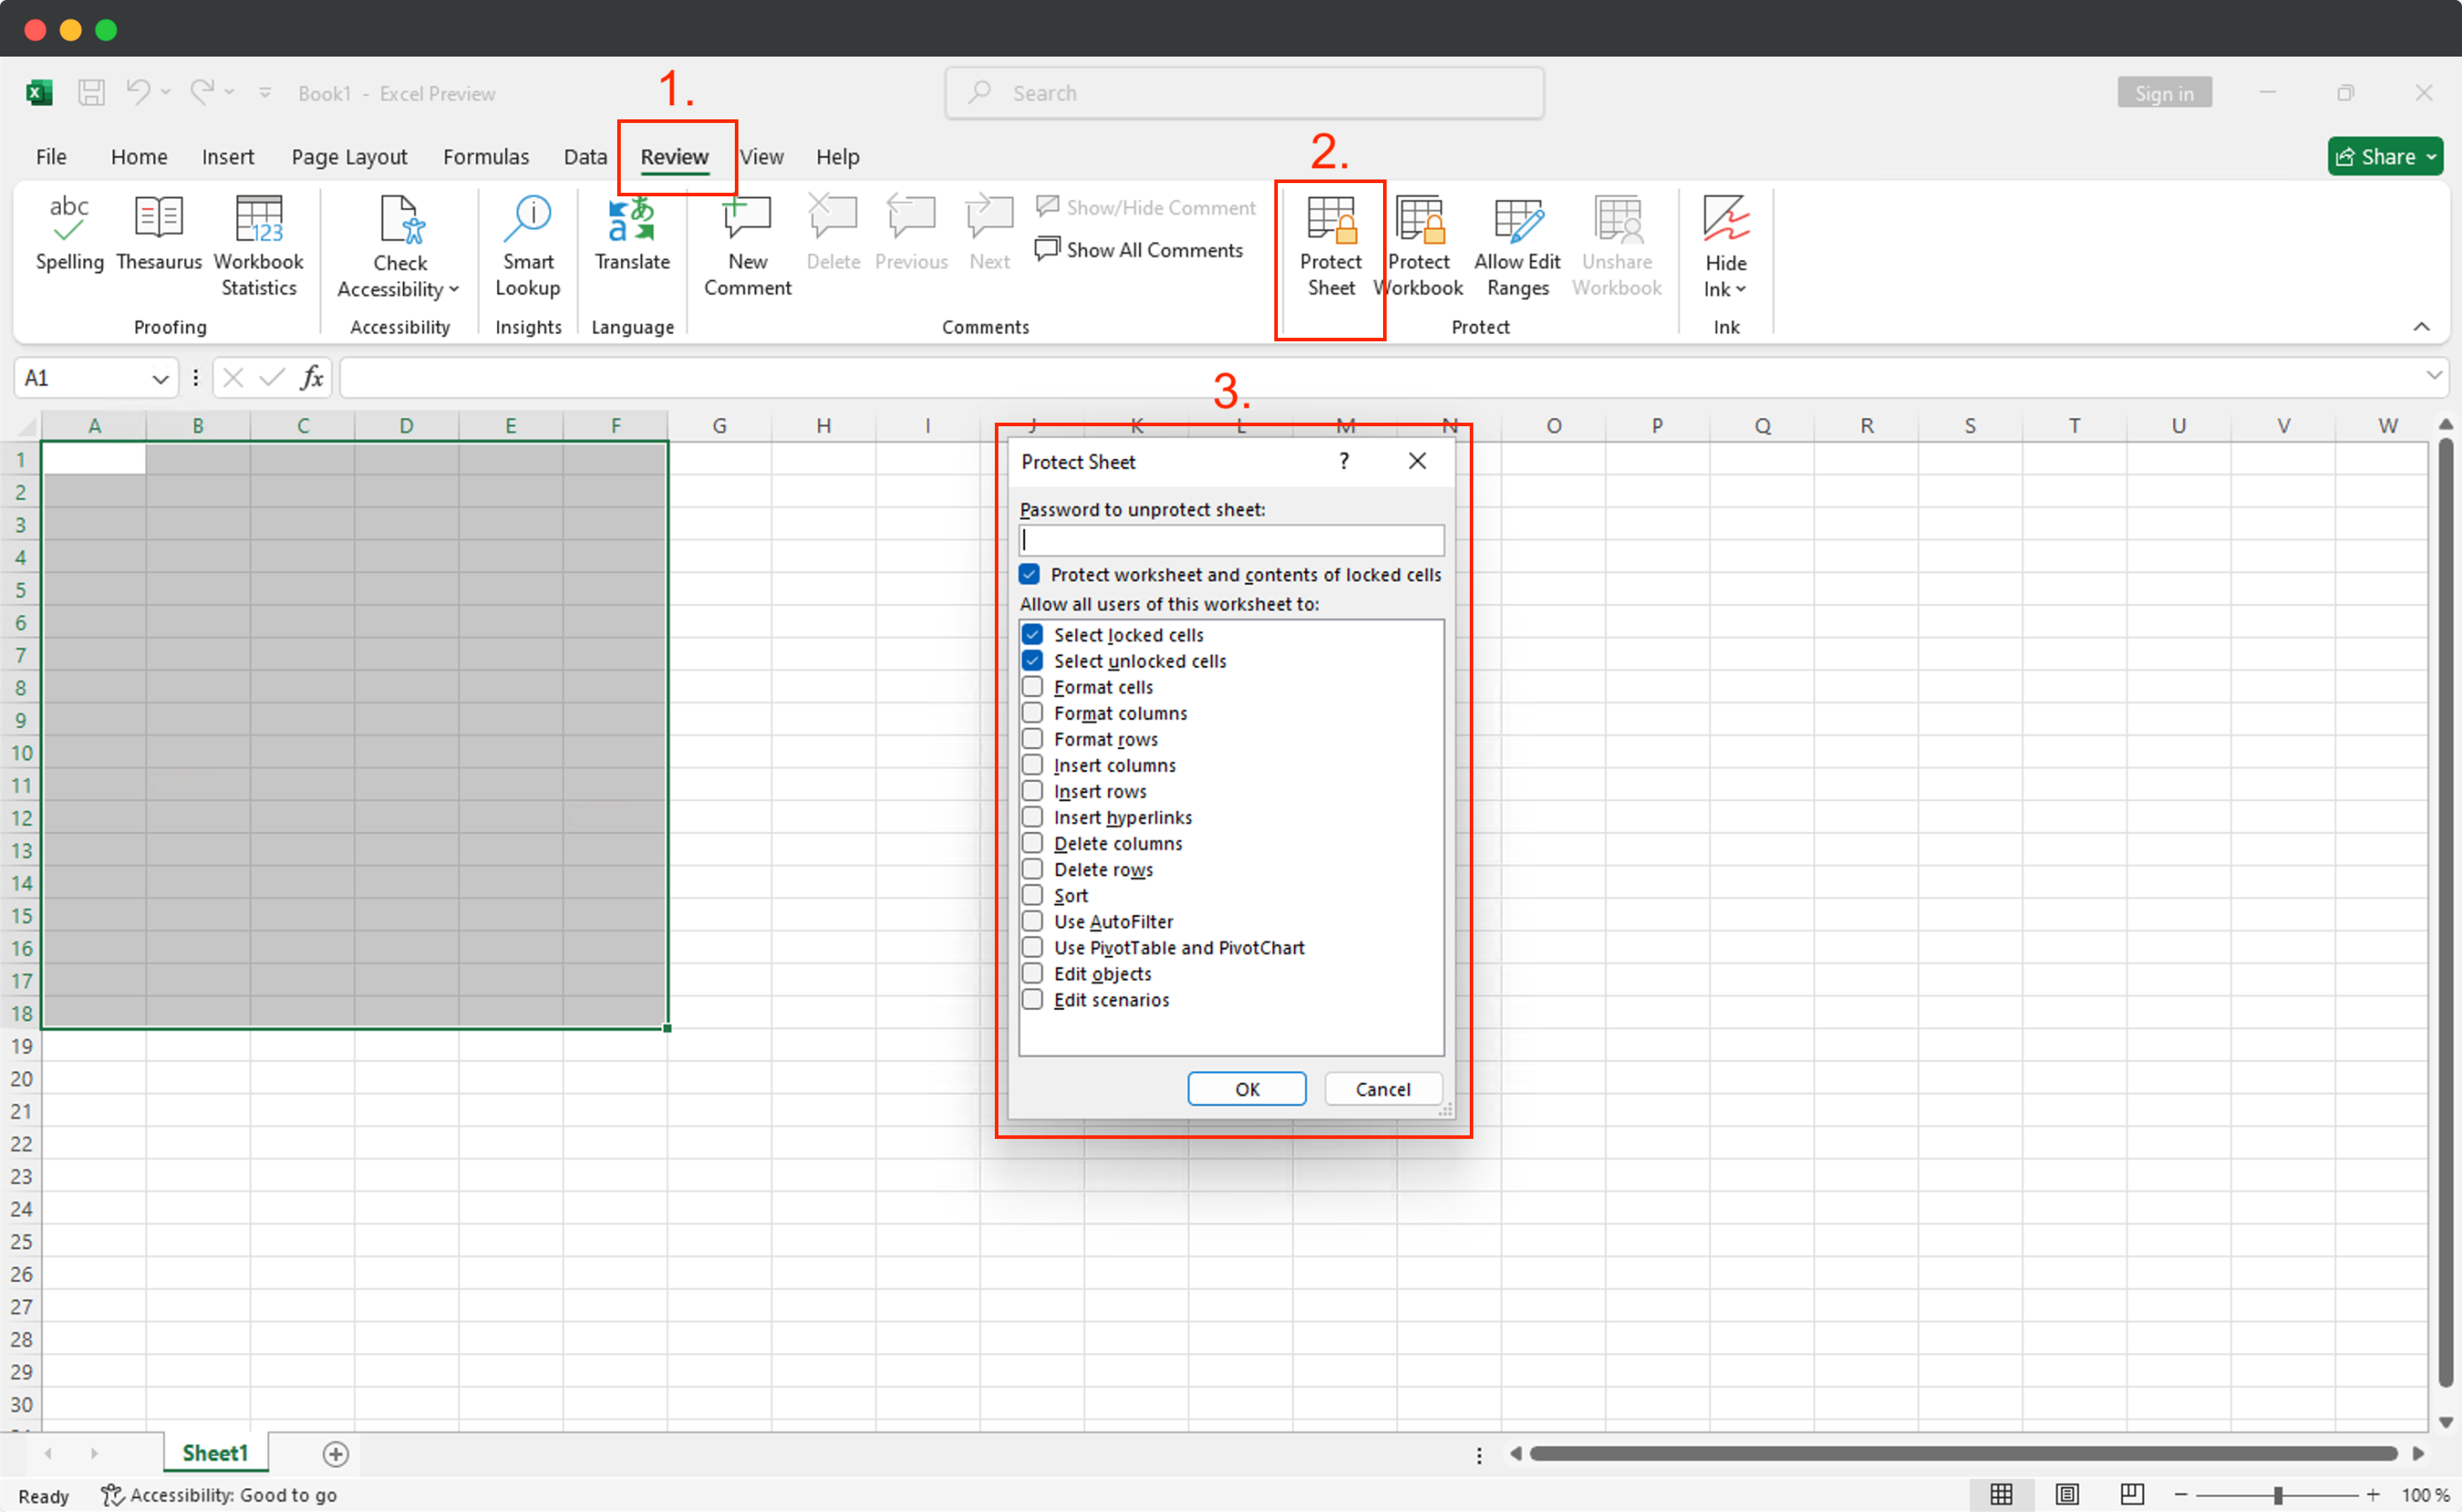
Select the Worksheet: Open your Excel workbook and click on the tab of the worksheet you want to protect at the bottom of the screen.
Navigate to the Review Tab: Look at the ribbon menu at the top of Excel and click on the ‘Review’ tab.
Click ‘Protect Sheet’: In the ‘Protect’ group (you might need to look closely depending on your Excel version), click the ‘Protect Sheet’ button.
Set Protection Options: A dialog box will appear. Here’s where you make key decisions:
- Password (Optional but Recommended): You can enter a password to unprotect the sheet later. If you don’t set one, anyone can unprotect it just by clicking the button again. Choose a memorable but secure password if you use one.
- Allow Users to: Below the password field, there’s a list of actions users can perform on the protected sheet even while it’s locked. By default, only ‘Select locked cells’ and ‘Select unlocked cells’ are checked. You might want to allow users to format cells, insert hyperlinks, or use AutoFilter, depending on your needs. Carefully check the boxes for actions you want to permit.

Confirm: Click ‘OK’. If you set a password, Excel will prompt you to re-enter it for confirmation.
That’s it! The cells on your sheet (unless specifically unlocked beforehand - more on that next) are now protected from editing. Anyone trying to change a locked cell will get a notification telling them the sheet is protected. From our experience, this is perfect for preventing accidental changes in templates or final reports shared internally.
Locking Specific Cells While Allowing Edits Elsewhere
What if you want people to input data into certain cells (like data entry fields) but protect everything else (like headers, formulas, or instructions)? This is a common scenario, especially for templates or collaborative worksheets. Excel handles this beautifully by letting you unlock specific cells before you protect the sheet.
Identify Editable Cells: First, determine exactly which cells or ranges users should be allowed to edit.
Unlock Those Cells:
- Select the cell(s) or range(s) you want to make editable. You can select multiple non-adjacent cells by holding down the
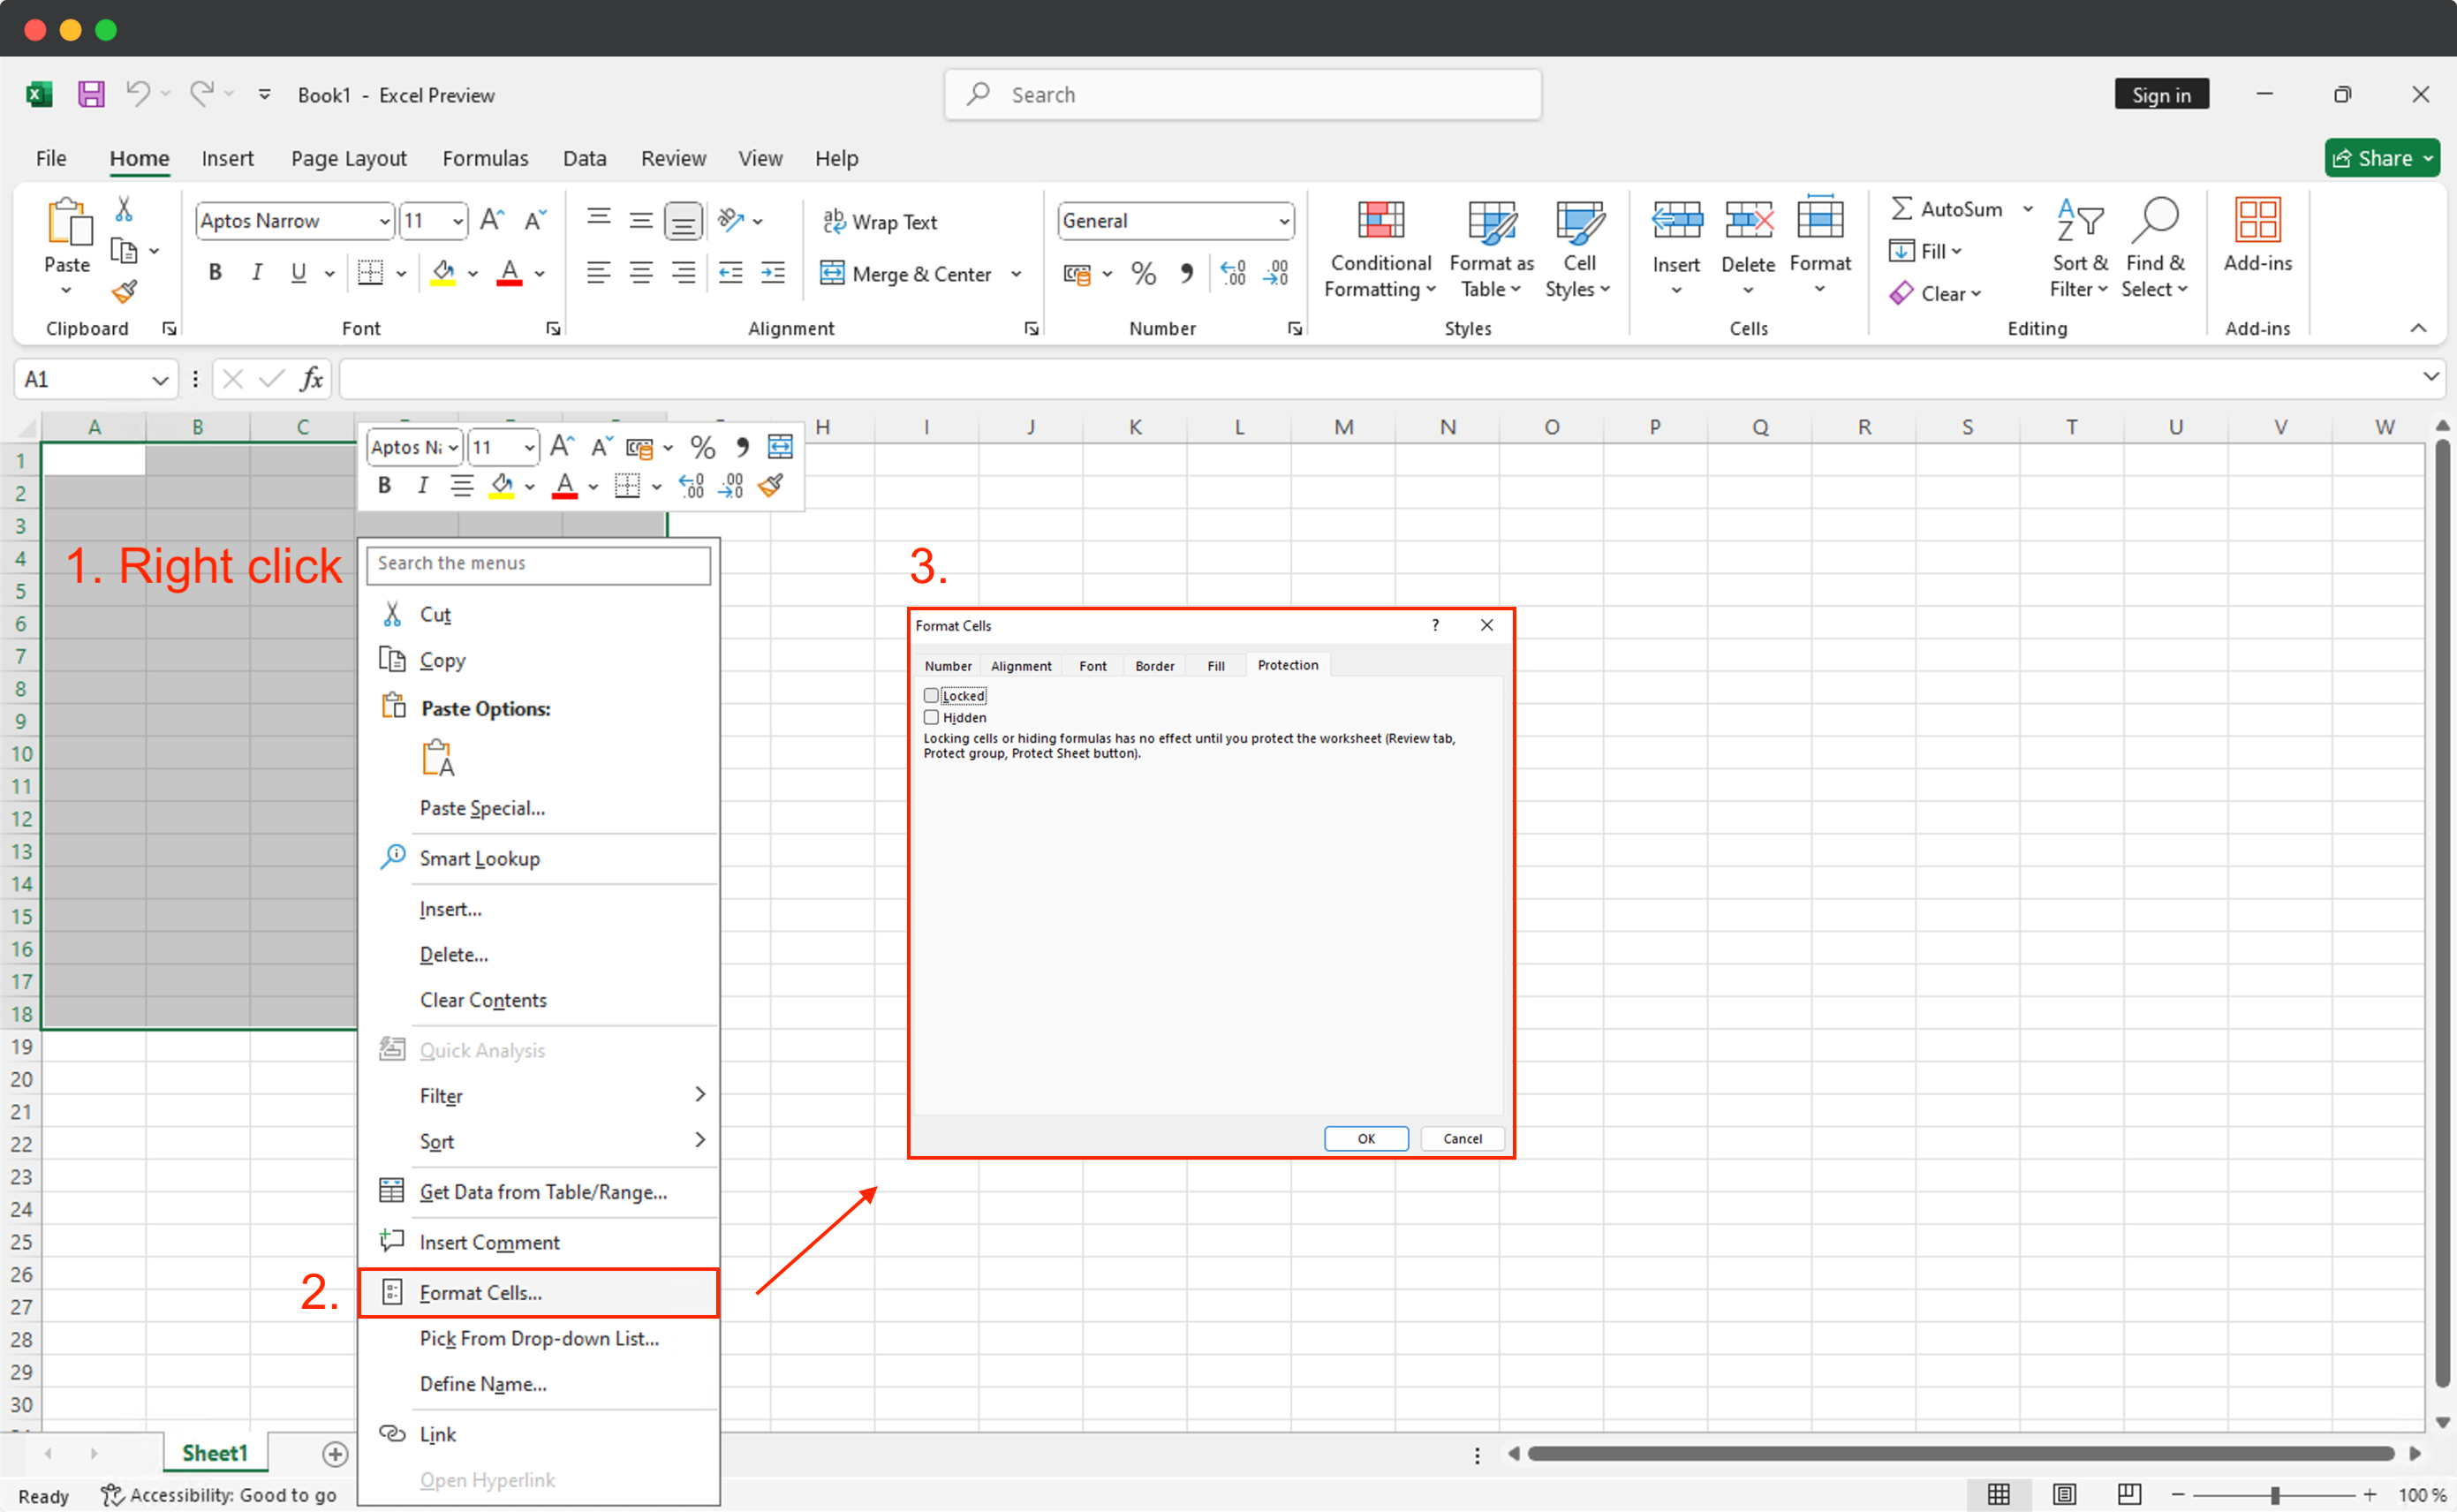
Ctrlkey while clicking. - Right-click on the selected cells and choose ‘Format Cells’. (Alternatively, go to the ‘Home’ tab, click the small arrow in the corner of the ‘Font’, ‘Alignment’, or ‘Number’ group to open the Format Cells dialog).
- Go to the ‘Protection’ tab within the ‘Format Cells’ dialog.
- Uncheck the ‘Locked’ box. By default, all cells in Excel are ‘Locked’, but this setting only takes effect after you protect the worksheet. Unchecking it means these specific cells won’t be protected when you activate sheet protection.
- Click ‘OK’.

- Select the cell(s) or range(s) you want to make editable. You can select multiple non-adjacent cells by holding down the
Protect the Worksheet: Now, follow the steps from the previous section: Go to the ‘Review’ tab > ‘Protect Sheet’. Set your options (like an optional password) and ensure the ‘Select unlocked cells’ option is checked (it usually is by default). Click ‘OK’.
Now, users can freely type into and edit the cells you specifically unlocked, but they’ll be prevented from changing anything in the cells that remained locked. This gives you granular control - essential when you need specific inputs without risking the integrity of the rest of your sheet’s structure or calculations.
Protecting the Entire Excel Workbook Structure
Sometimes, protecting individual sheets isn’t enough. You might want to prevent others from adding, deleting, renaming, hiding, or unhiding worksheets within your workbook. This maintains the overall structure you’ve established.
Protecting the workbook structure is done differently:
Go to File Info: Click the ‘File’ tab in the top-left corner.
Select Protect Workbook: In the ‘Info’ section (which usually opens by default), click the ‘Protect Workbook’ button. This reveals a dropdown menu.
Choose ‘Protect Workbook Structure’: Select this option from the menu.
Set Password (Optional but Recommended): A small dialog box will appear, asking for an optional password. Again, using a password prevents others from simply turning off the structure protection. Choose wisely and remember it!
Confirm: Click ‘OK’. Re-enter the password if prompted.
With the workbook structure protected, users won’t be able to tamper with the arrangement of your sheets. They can still edit data on unprotected sheets (or unlocked cells on protected sheets), but the overall layout remains secure. This is particularly useful for standardized reports or complex models where the sheet order and existence are critical.
Password Protecting the Entire Excel Workbook (Restricting Access)
Need to ensure only authorized individuals can even open the Excel file? This requires a higher level of security - encrypting the workbook with a password. Without the password, the file is inaccessible.
Here’s how to apply this level of protection:
Go to File Info: Click the ‘File’ tab.
Select Protect Workbook: In the ‘Info’ section, click ‘Protect Workbook’.
Choose ‘Encrypt with Password’: Select this option from the dropdown menu.
Enter Password: An ‘Encrypt Document’ dialog box will appear. Enter a strong password.
Confirm Password: Click ‘OK’. You’ll be prompted to re-enter the password to confirm it.
Save the File: The protection takes effect once you save the workbook.
Now, whenever anyone tries to open this file, they will be required to enter the password first. This is a fundamental step for securing truly sensitive Excel files before they are stored or shared.
Beyond Excel: Securing Your Shared Files
While Excel’s built-in protection is powerful for controlling editing and access within the application, what happens when you need to share that protected file securely, especially outside your organization? Emailing sensitive spreadsheets, even password-protected ones, can still pose risks:
- Lack of Tracking: You don’t know if or when the recipient opened it, or who they might forward it to.
- No Download Control (Beyond Password): Once opened, a password-protected Excel file can often still be saved locally, potentially losing your control over its distribution.
- Accidental Forwarding: Sensitive files can easily end up in the wrong hands via email chains.
This is where tools designed for secure document sharing come into play. Platforms like Papersend complement Excel’s protection by adding crucial layers for the sharing process itself.
Consider a scenario: You’ve password-protected a sensitive financial projection workbook (.xlsx). Instead of emailing it directly, you could upload it to Papersend and share it via a secure link. This allows you to:
- Add Extra Access Controls: Require email verification, set link expiry dates, or limit the number of views - layers beyond just the Excel password. Learn more about Papersend’s security features.
- Track Engagement: Get real-time notifications when the file is viewed and see detailed analytics on who viewed it and for how long. This is invaluable for follow-ups or confirming receipt. Explore document tracking capabilities.
- Prevent Unauthorized Downloads (Optional): Configure settings to prevent downloading, adding another layer of control over the file’s distribution.
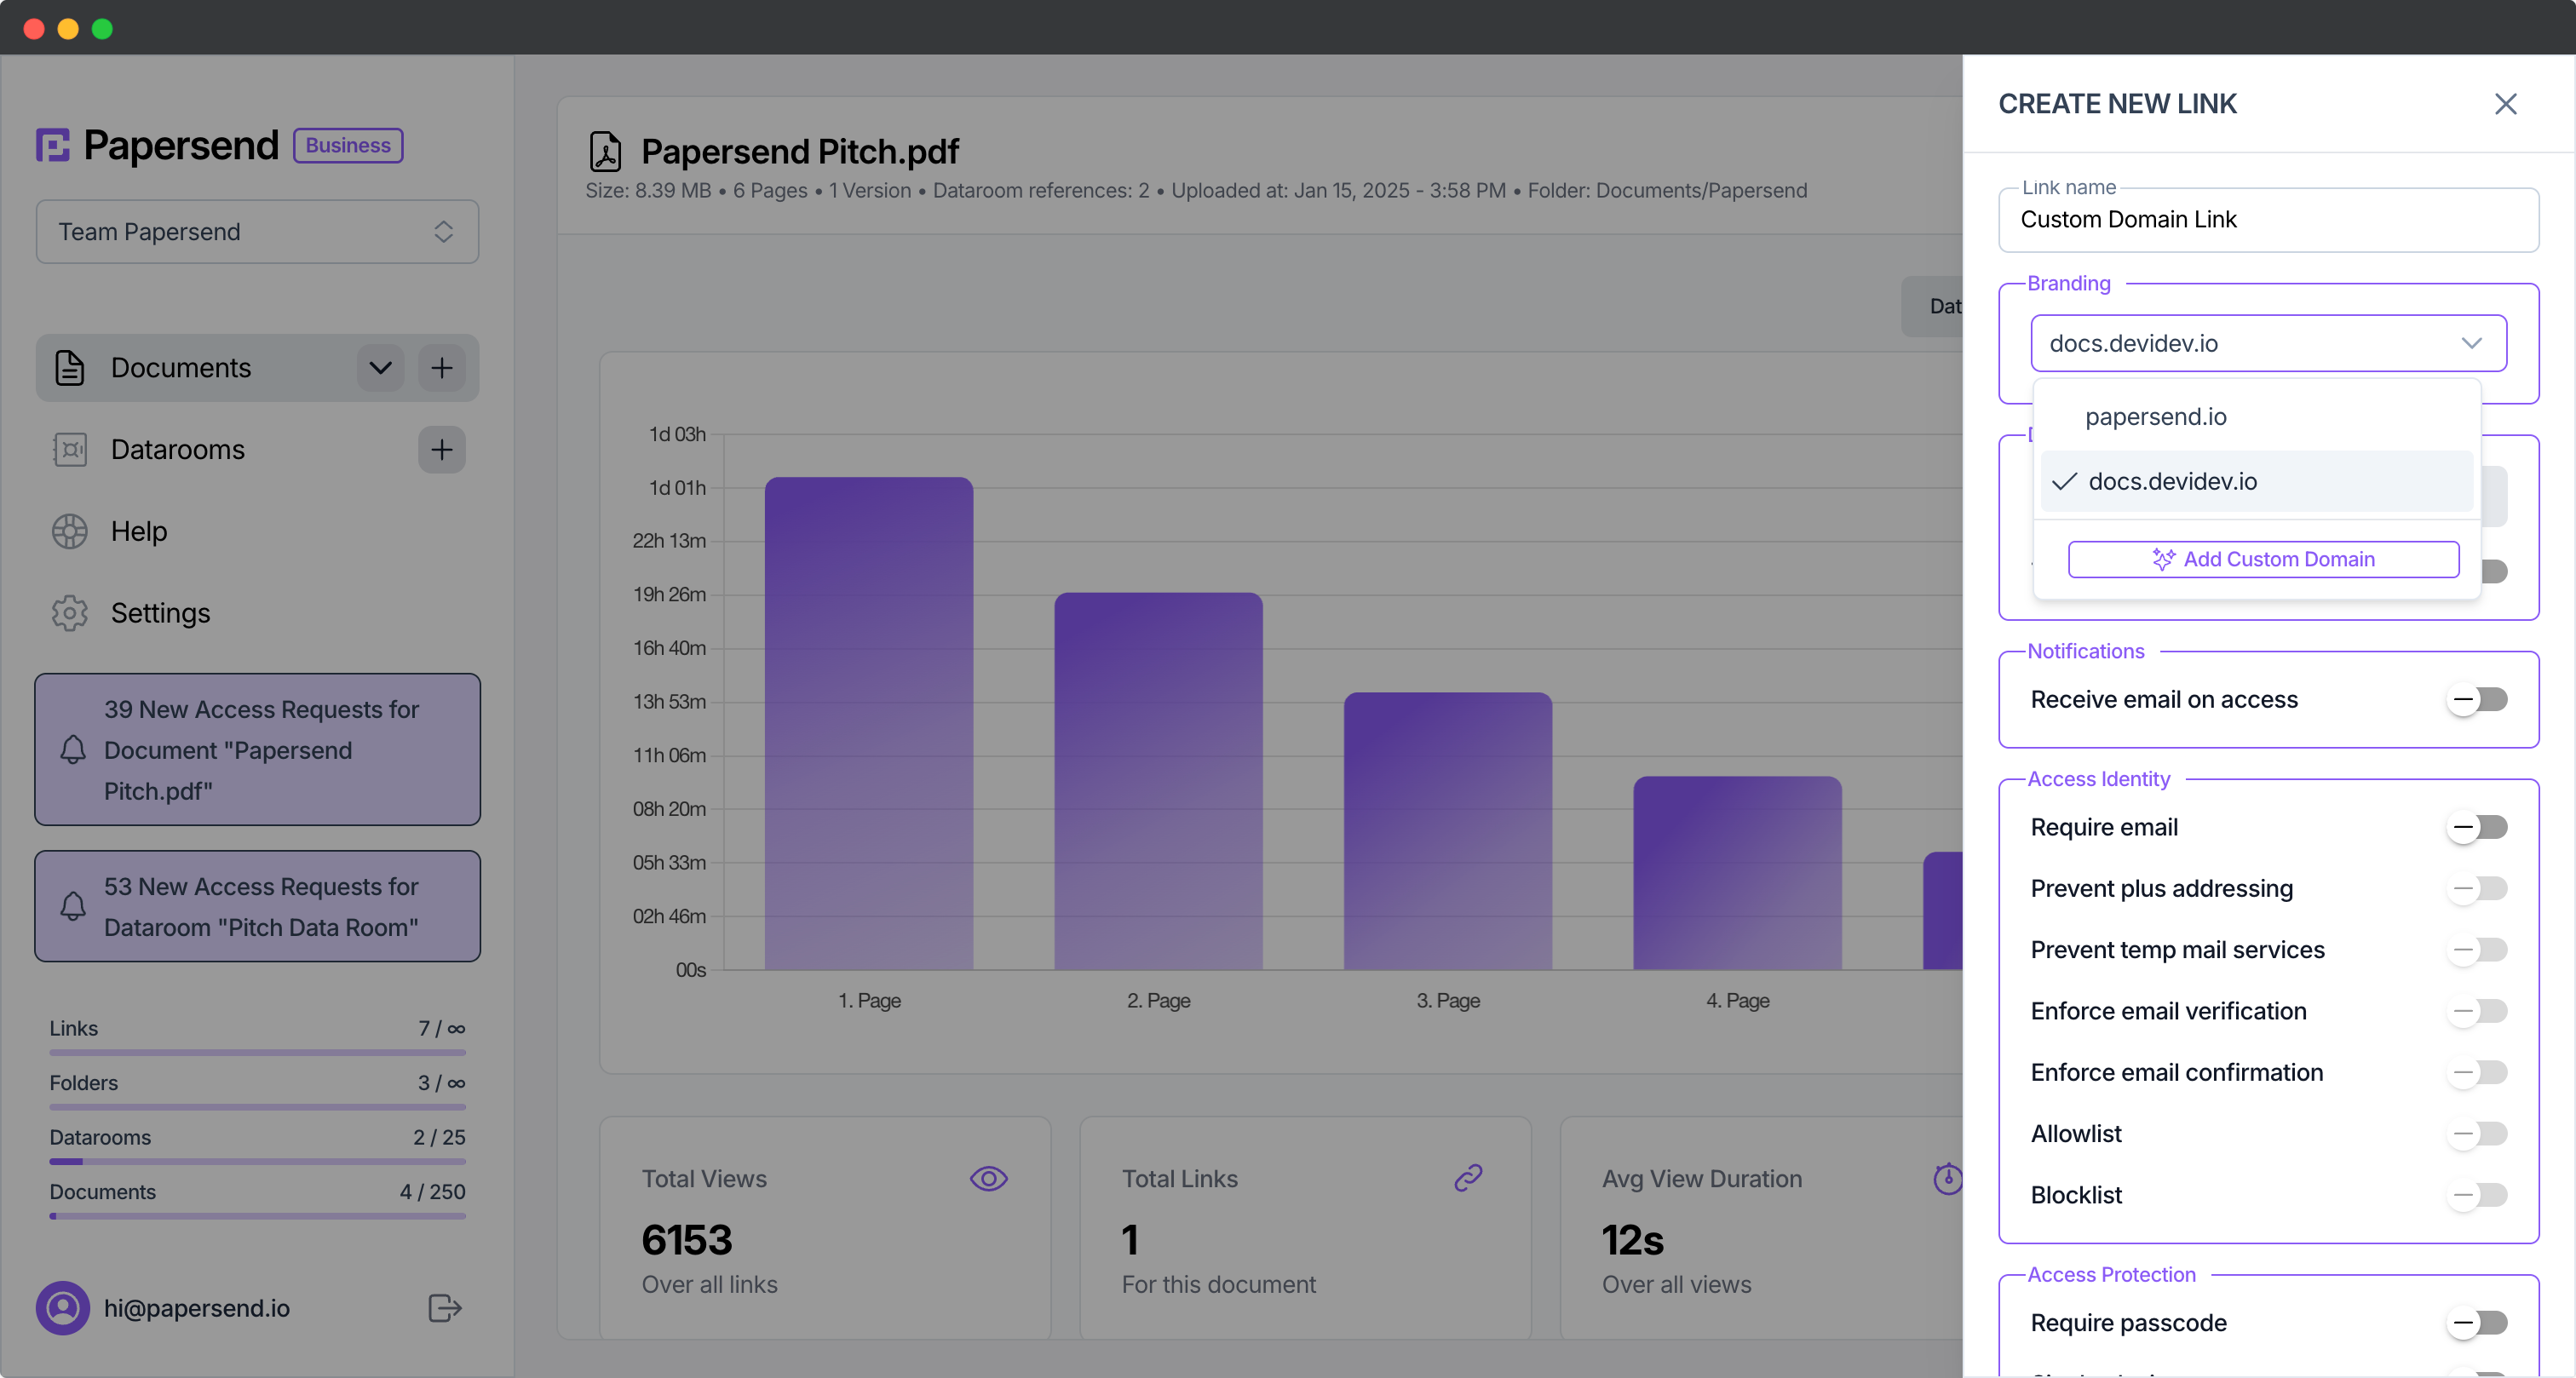
- Maintain Professionalism: Share via a branded portal, enhancing your professional image. Check out how to use custom domains.

Using a tool like Papersend doesn’t replace Excel’s internal protection; it enhances the security and control around the sharing of your important files, protected or not. It addresses the “what happens next?” after you’ve secured the document itself.
Key Takeaways & Choosing Your Protection Level
Protecting your Excel workbooks and worksheets is crucial for maintaining data integrity and controlling access. Remember these key methods:
- Protect Sheet (
ReviewTab): Prevents editing of locked cells on a specific worksheet. Ideal for preventing accidental changes to formulas or final data. Use optional passwords for better security. - Unlock Specific Cells (
Format Cells>Protection): Use this before protecting a sheet to allow user input in designated areas while keeping the rest locked. Essential for templates and collaborative sheets. - Protect Workbook Structure (
File>Info): Prevents adding, deleting, renaming, or hiding/unhiding sheets. Preserves the overall layout of your workbook. - Encrypt with Password (
File>Info): Requires a password to open the entire Excel file. Use this for sensitive files needing restricted access. Remember lost passwords cannot be recovered.
By using these tools effectively, you can confidently manage and share your Excel files, knowing your hard work and sensitive data are properly safeguarded. Enhance your workflow further by adopting secure sharing practices for when documents leave your direct control.
Frequently Asked Questions
Go to the 'Review' tab, click 'Protect Sheet', enter an optional password, and select the actions you want to allow or disallow for users. This locks all cells marked as 'Locked' (which is the default).
Yes, you can protect the entire workbook structure to prevent changes like adding/deleting sheets. Go to 'File' > 'Info' > 'Protect Workbook' > 'Protect Workbook Structure'. You can also encrypt the entire file with a password via 'File' > 'Info' > 'Protect Workbook' > 'Encrypt with Password' to restrict opening it.
First, select the cells you want users to edit. Right-click, choose 'Format Cells', go to the 'Protection' tab, and uncheck the 'Locked' box. Click OK. Then, protect the worksheet via the 'Review' tab > 'Protect Sheet'. Users will only be able to edit the unlocked cells on the protected worksheet.
Navigate to the 'Review' tab and select 'Protect Sheet'. In the dialog box that appears, enter a password in the 'Password to unprotect sheet' field before clicking OK. You'll need to confirm the password.
The most robust way is to encrypt it. Use 'File' > 'Info' > 'Protect Workbook' > 'Encrypt with Password'. This requires the password to even open the file. Remember, this password cannot be recovered if lost.